(708) 775-3648

Can You Install a Kitchen Backsplash in Orland Park, IL?
Matt Pehr
September 5, 2026
Request An Estimate
Written by Matt Pehr, owner of The Floor 4U.
Yes. The Floor 4U installs kitchen and bathroom backsplashes in Orland Park, IL. Backsplash tile falls under our tile and stone installation service, run from the Mokena showroom, and the in-home estimate is free. We measure the wall, prep the substrate, set the tile, grout, seal and caulk the joints at the counter and cabinets.
Ready to price your backsplash? Call Matt Pehr at (708) 775-3648 or request a free in-home estimate. We measure the actual wall, bring samples you can hold against your counter in your own light, and leave a written number. See everything we do in Orland Park.
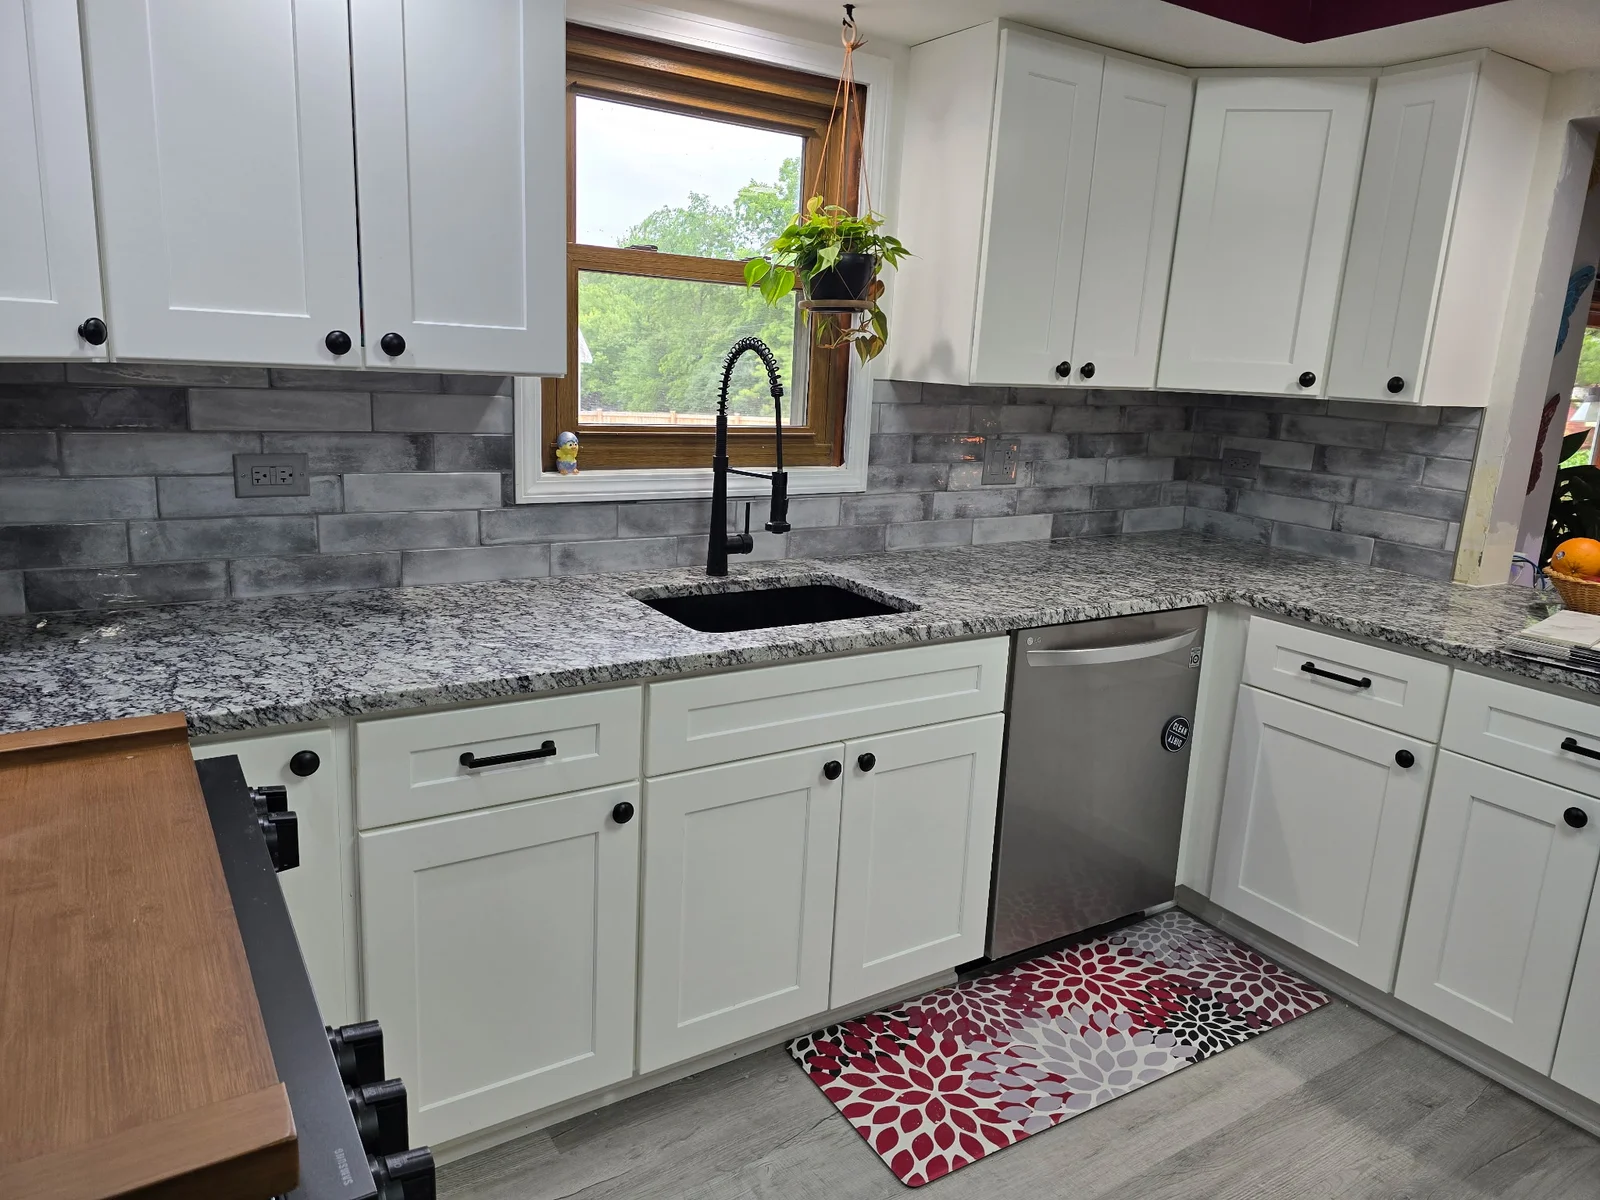
Who Installs Kitchen Backsplashes in Orland Park, IL?
We do. Orland Park is one of the towns we serve, and backsplash tile is part of our tile and stone installation work, alongside floors, showers and bathroom walls. We work out of the Mokena showroom at 9614 Willow Lane, Mokena, IL 60448, open Monday through Friday, 9:00 AM to 5:00 PM, with Saturday and Sunday by appointment. The phone is (708) 775-3648.
Kitchens are the common request, but the same work covers a bathroom vanity backsplash, a laundry wall and the run behind a wet bar. Tile on any wall is the same trade.
Two other pages here cover backsplash work, so it helps to say what each is for. The tile backsplash store page is for browsing what is in stock. The backsplash installation page is where the pricing lives, broken out by tile type and by labor-only versus supply-and-install. This page is the Orland Park answer: whether we come out, what happens when we do, and what decides how long it takes.
What a Kitchen Backsplash Install Involves, Start to Finish
A backsplash looks like a small job because it is a small area. It is also an area with more edges per square foot than any floor you will ever have installed, and almost all the labor is in the edges.
Measure and take off the material. The field runs from the countertop to the underside of the upper cabinets, then usually higher behind the range or hood. HomeGuide publishes the arithmetic for it: multiply the width and height of the area in inches, divide by 144, then add fifteen percent for overage (captured 2026-09-05). That fifteen percent is not padding. It covers the diagonal cuts, the pieces that break on the saw, and the spare box you want three years from now.
Check the substrate, then fix it. A kitchen backsplash is treated as a dry area. HomeGuide notes it needs no waterproof underlayment or backer board, and that tile bonds directly to drywall as long as the surface is flat and even (captured 2026-09-05). The catch is in those last four words. Drywall that has held a laminate return for twenty years is rarely either. Old adhesive gets scraped, screw pops get set and skimmed, a wavy seam gets floated, and bare drywall gets primed. Skip it and every tile telegraphs it, because a wall tile has nowhere to hide a hump.
Set the layout before anything gets stuck to the wall. Counters are not level and cabinets are not square, so we work from a level line struck off the low point of the countertop rather than off the counter itself. Then the pattern needs a center. A window over the sink, a hood, a range and the run of upper cabinets rarely agree on one, so somebody has to choose which the eye will read as symmetrical. That gets decided with a pencil and a dry-laid row, not afterward.
Set the tile, then cut the openings. Homewyse describes the basic scope the way the trade does: measure, secure the substrate, lay out the pattern, set with mortar, then grout and clean (captured 2026-09-05). What separates a clean job from a rough one is the openings. A standard kitchen backsplash carries four to eight outlets and switches, plus a window return, plus the outside corner where the field ends. Every one is a wet-saw cut, and every one shows. The electrical itself is a separate trade: as the wall thickens by the depth of the tile, the boxes need to come forward so the cover plates sit flat. Published cost guides treat that as electrician work rather than part of the tile scope, and so do we.
Grout, caulk, then decide about sealer. Grout does not go on the same day the tile does. Custom Building Products states in its Polyblend Plus sanded grout data sheet, TDS-360, published 3/2/2021, that the setting material must cure a minimum of 24 to 48 hours before cement grout is applied, unless a rapid-setting mortar is used (captured 2026-09-05). The same sheet is explicit that cement grout is not for use in movement joints or changes of plane, and that caulk or silicone belongs there instead. In a kitchen that means the countertop joint, the inside corners and the line under the cabinets get caulked. That is the joint that cracks first on a hurried job, and it cracks because it was filled with the wrong material. Sealing is optional; the same manufacturer calls for a pH-neutral, water-based penetrating sealer where one is wanted, and we cover the maintenance side on our tile and grout cleaning page.
Thinset or Mastic: The Adhesive Decides Which Tile You Can Use
This is the part almost nobody explains before the tile is bought, and the part that most often changes a homeowner’s mind at the counter.
There are two families of setting material for a wall. Ready-mixed organic adhesive, which the trade calls mastic, comes out of a pail, grabs fast and holds a tile vertically without sliding. Thin-set mortar is cement-based, mixed on site, fills small variations better, and is not held to the tile-size and wet-area limits that mastic is. Mastic is faster; thin-set is more capable. The tile you choose decides which one is allowed.
Those limits are published. The Custom Building Products data sheet for AcrylPro professional tile adhesive, TDS-127, published 3/22/2023, recommends the adhesive for tile up to 8 inches on any side, says it can be used to 15 inches but that dry time increases significantly, and directs the installer to a polymer-modified large format mortar once any side exceeds 15 inches (captured 2026-09-05). The same sheet lists gypsum wallboard in interior dry areas, cement backerboard and existing ceramic tile among its approved substrates, names transparent glass tile, translucent stone and gauged stone thicker than 3/8 inch in its limitations, and states it is not for use over radiant heat systems.
Read that list next to a tile showroom and the pattern is obvious. A 3 by 6 ceramic subway tile is squarely inside the fast method. A mesh-backed glass mosaic is not, and gets set in white thin-set so the setting bed does not read through the glass. A 24 inch slab-look porcelain behind a range is a large format mortar job. Marble is stone, so it goes with the stone method. None of that is a judgment about taste; it is a schedule and a materials list that follow from the tile, which is why we would rather see the sample before quoting.
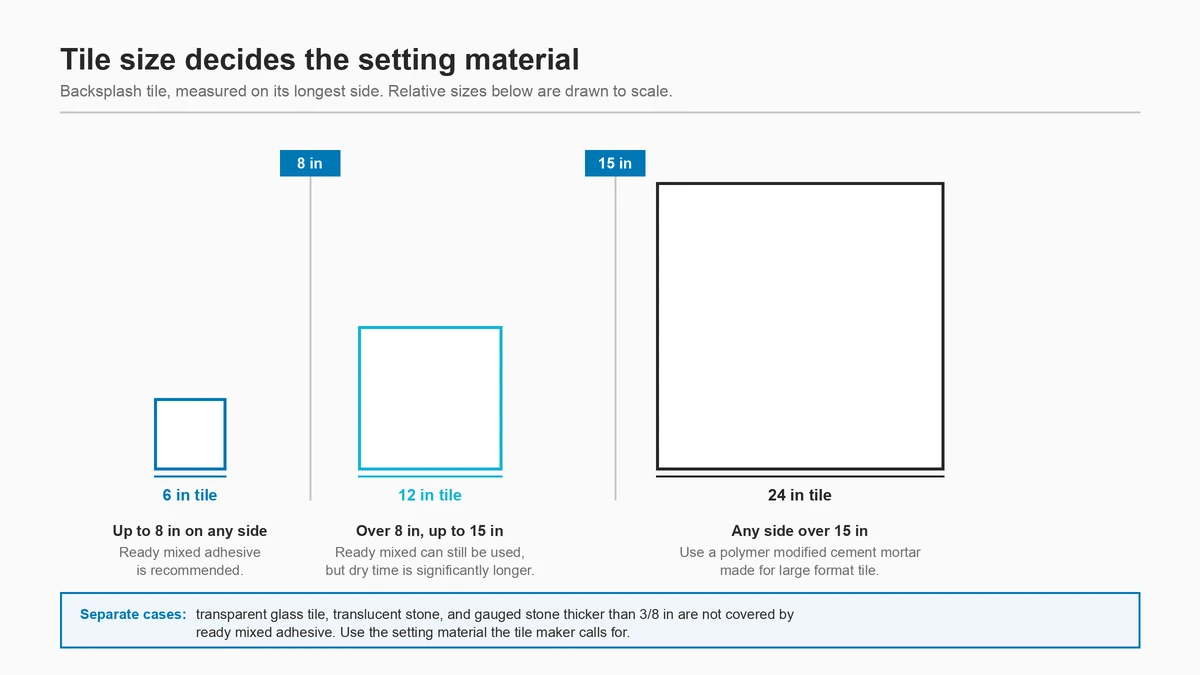
| What you picked | Typical setting material | Why |
|---|---|---|
| Ceramic or porcelain up to 8 in on a side (3×6 subway, 4×4) | Ready-mixed mastic or thin-set mortar | Inside the size range the adhesive data sheet recommends |
| Ceramic or porcelain 8 in to 15 in on a side | Usually thin-set mortar | The data sheet allows mastic to 15 in but warns dry time increases significantly |
| Any tile over 15 in on a side, including slab-look porcelain | Polymer-modified large format mortar | Directed by the manufacturer once any side exceeds 15 in |
| Glass mosaic sheets | Thin-set mortar, white | Transparent glass tile is named in the adhesive limitations; a white bed keeps the color true |
| Marble, travertine or other natural stone | Thin-set mortar suited to stone | Gauged stone over 3/8 in and translucent stone are named in the limitations |
| Going over an existing sound ceramic backsplash | An adhesive the manufacturer lists for tile over tile | Existing ceramic tile is an approved substrate when it is clean, level and firmly bonded |
| A wall with a heated system behind it | Not the ready-mixed adhesive | The data sheet states it is not for use over radiant heat systems |
Large format tile is its own discipline on a wall as much as on a floor. If you are leaning that way, our large format tile installation page covers what changes.
How Long a Kitchen Backsplash Takes in a Kitchen You Still Live In
Two to four days, and only a few hours of that is anyone in your kitchen with tile in hand.
HomeGuide puts a kitchen backsplash at 2 to 4 days, with 1 to 3 hours of actual tile laying and more time to cut around multiple outlets or lay complex patterns, and puts drying time for mortar and grout at 12 to 24 hours each (captured 2026-09-05). Fixr describes the same shape from the other side: a professional can install most backsplashes within a few hours, but needs at least two days for a tiled backsplash to allow for drying and grouting (captured 2026-09-05). Both agree with the grout data sheet, which will not let cement grout go down until the mortar has cured 24 to 48 hours.
So the calendar is a cure schedule, not a labor estimate. Day one is prep, layout and setting. Then the wall sits. Day two or three is grout, caulk and clean, and that visit is short. Your sink and range stay usable, the counters get covered, and the only real inconvenience is that you cannot lean anything against the wall for a day.
One winter caveat if the kitchen is torn up: the grout manufacturer asks that installations be enclosed, protected and held above 50 degrees F for at least 72 hours to cure properly. In a mid-winter remodel with the heat off and a door open to the garage, that matters more than the schedule does.
Choosing Backsplash Tile That Installs Well
The lines we carry that cover backsplash and wall work are MSI Surfaces, whose catalog is organized into backsplash and wall tile collections; Daltile, which publishes a kitchen and bathroom backsplash line; and Virginia Tile, whose wall tile catalog runs porcelain, stone, glass and metal (all three verified on their manufacturer sites, 2026-09-05). Between them you can reach almost any look a kitchen calls for.
Choosing is faster in the right order, and most people go backwards. Pick the format first, meaning size and shape, because that sets the labor, the adhesive and the schedule. Pick the finish second: gloss bounces light around a dark kitchen and shows every wave behind it, matte hides both, and a handmade-look tile brings its own shadow line. Pick the color last, because it is the only one of the three with no consequences for how the job runs.
Color stalls people longest, so we wrote it up separately: how to choose a backsplash color for your kitchen. To handle material first, visit the Mokena tile backsplash showroom, or we will bring samples out. If the floor is in play too, our guide to tile on floors is the companion piece.
Can a Beginner Install a Kitchen Backsplash, and When Is Hiring the Better Call?
A beginner can absolutely install a peel-and-stick backsplash. HomeGuide is straightforward about the split: a DIY backsplash is easy with peel-and-stick tiles, while mortar installations require more skill (captured 2026-09-05). The same guide puts peel-and-stick service life at 3 to 5 years under daily steam and frequent cleaning, and up to 10 years for high-quality adhesive mats in dry areas. If you are staging a house, renting, or you want a different wall in two years, that is a rational purchase.
Mortar-set tile is where the line sits, and four things break a first attempt: lippage, where one tile edge stands proud of the next because the wall was never flattened; the outlet cuts, because a wet saw does not forgive a measurement taken from the wrong edge; grout in the changes of plane, which the manufacturer warns against and which cracks at the counter joint within a season; and grouting before the mortar has had its 24 to 48 hours, which pulls tiles loose while you clean haze off them. None is hard to avoid. All four are hard to fix, because the fix is removal.
The other option people weigh is buying the install through a big-box retailer. HomeGuide, captured 2026-09-05, reports that Home Depot charges $800 to install a 25 square foot backsplash including tile and setting materials, and describes big-box backsplash installation as subcontracted rather than performed by the store associate helping with product selection. These are published national ranges, not The Floor 4U pricing. The number is not the interesting part. The structure is. In that model the person who helped you choose the tile is not the person who will set it. Hire a local tile contractor and one company owns the measurement, the material and the layout call, and you can ask the person doing the work why the pattern is centered where it is.
What Changes the Job in an Orland Park Kitchen
Orland Park sits in Cook County, and we work across the village and the communities inside it, including Crystal Tree, Brook Hills, Marley Creek and Silver Lake. The housing stock is why the same job runs two ways here.
In the older parts of town, kitchens often arrive with a 4 inch tile course already bonded above the counter, or with plaster instead of drywall. Both are workable, and whether the old tile comes off or gets tiled over is a judgment made at the wall, not over the phone. Published guidance and the adhesive data sheet agree on the condition: go over an existing backsplash when it is clean, level and firmly bonded, and take it off when the new tile is heavy enough that the substrate should not carry both. Removal is separately scoped, and it drags when an older adhesive fights back, because the wall behind has to survive. When it does not, drywall repair and priming come first.
In the 1990s and 2000s subdivisions the starting condition is usually a laminate countertop return or a short builder-grade course on flat drywall in decent shape. Those are the fast ones: prep is light, the only layout question is where the pattern centers, and the job runs at the front end of the two-to-four-day window.
Either way, the answer comes from standing in the kitchen, which is what the free in-home estimate is for. Everything else we do in the village is on our Orland Park flooring page.
Frequently Asked Questions
Do you install kitchen backsplashes in Orland Park, IL?
Yes. The Floor 4U installs kitchen and bathroom backsplashes throughout Orland Park, working out of the Mokena showroom at 9614 Willow Lane. Backsplash tile is part of our tile and stone installation service, the same trade that handles floor tile, shower walls and bathroom surrounds. The in-home estimate is free and we bring samples with us.
How much does it cost to have someone install a backsplash?
HomeGuide, captured 2026-09-05, puts backsplash installation at $10 to $50 per square foot, or $500 to $1,700 on average including materials and labor, and Fixr, captured the same day, puts the range at $500 to $1,500 with an average of $1,000. These are published national ranges, not The Floor 4U pricing. For a fuller breakdown by tile type, see the backsplash installation page.
How much does Home Depot charge to install a backsplash?
HomeGuide, captured 2026-09-05, reports that Home Depot charges $800 to install a 25 square foot backsplash including tile and setting materials, and describes big-box backsplash installation as subcontracted rather than performed by the store associate helping with product selection. These are published national ranges, not The Floor 4U pricing.
Can a beginner install a kitchen backsplash?
A beginner can install a peel-and-stick backsplash; HomeGuide calls that the easy DIY route and says mortar installations require more skill (captured 2026-09-05). Hire out the mortar-set version when the wall is not flat, when there are several outlets to cut around, or when the tile is glass, stone or larger than 8 inches on a side, because those are the jobs that punish a first attempt.
How long does a kitchen backsplash installation take?
Two to four days. HomeGuide puts a kitchen backsplash at 2 to 4 days, with 1 to 3 hours of actual tile laying and 12 to 24 hours of drying for mortar and for grout, and Fixr says a professional needs at least two days for a tiled backsplash to allow for drying and grouting (both captured 2026-09-05). Most of that window is curing, not labor.
Do you have to remove the old backsplash first?
Not always. You can tile over an existing backsplash when the surface is clean, level and securely bonded, using an adhesive the manufacturer lists for tile over tile; existing ceramic tile is an approved substrate on the adhesive data sheets. Remove it when the new tile is large or heavy, or when the old field is loose, hollow or uneven. That call gets made at the wall.
Does kitchen backsplash grout need to be sealed?
Sealing cement grout is optional protection rather than a requirement. Custom Building Products calls for a pH-neutral, water-based penetrating sealer where a sealer is wanted. What is not optional is caulk: the same manufacturer states cement grout is not for use in movement joints or changes of plane, so the counter joint, the inside corners and the cabinet line get caulk, not grout.
Get a Free Backsplash Estimate in Orland Park
The Floor 4U is owned and run by Matt Pehr, and we install kitchen and bathroom backsplashes in Orland Park, Tinley Park, Mokena, Frankfort, New Lenox, Homer Glen, Oak Forest, Palos Heights and Lockport. Call (708) 775-3648 or request your free in-home estimate. We will measure the wall, look at the substrate you actually have, bring samples, and tell you which setting method your tile calls for before you buy it. The showroom is at 9614 Willow Lane, Mokena, IL 60448, open Monday through Friday, 9:00 AM to 5:00 PM.
Share
Recent Posts
October 8, 2026
Can You Install Flooring Over Existing Tile? (Video)
Matt Pehr explains when flooring can go over existing tile and why flatness, lippage, appliance clearance, and door swing need a closer look....
October 6, 2026
Engineered vs Solid Hardwood: Which Lasts Longer?
Engineered vs solid hardwood, compared by a Mokena installer: wear layer, refinishing, lifespan, basements, radiant heat, plank width, and cost....
October 6, 2026
Subfloor Repair and Floor Leveling in Mokena, IL
What subfloor repair and floor leveling involve before new flooring goes down in Mokena, IL, what published guides say it costs, and how...